New Feature: Financial tracking


Track your financials alongside material weights in Tracker
Note: This feature is only available to Tracker plan users.
Tracker has been primarily focused on tracking material tonnage information for an organization’s material diversion efforts. While this is the core use of the tool for many Tracker customers, some customers have expressed interest in tracking financial information alongside their weight data. We have recently launched a BETA version of our financial tracking feature and it is now available to all Tracker plan administrators.
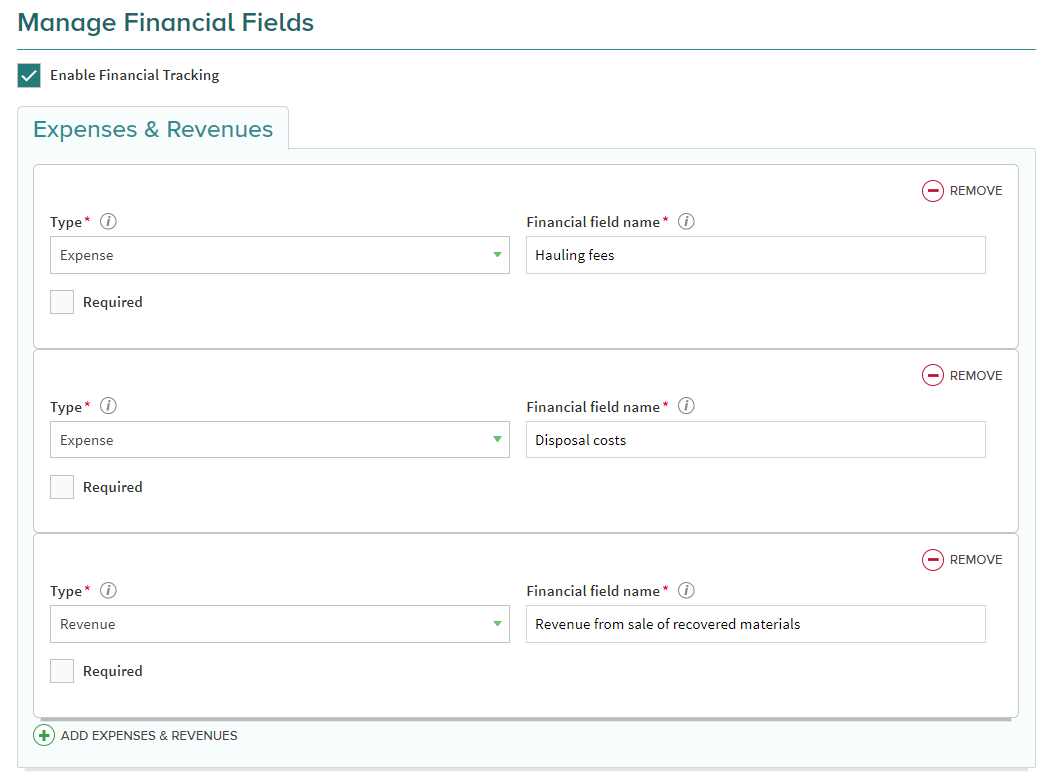
With financial tracking, you can configure up to 6 financial fields and categorize them as either expense or revenue. This will allow you and your reporting entities to track costs and revenues associated with your diversion activities. At this time, a financial item is associated with the entire material transaction, so if you’re looking to track an expense or revenue for a specific material, make sure you haven’t included any other material weights with the transaction.

Adding financial fields
Custom financial fields can be configured on the "Tracker Settings" program management page. You must have the required account permissions to access this page.
- Go to bottom of the “Tracker Settings” page and check the box to “Enable Financial Tracking”.
- Click “ADD EXPENSES & REVENUES” to begin the field creation process.
- Select the type of field you wish to create (expense or revenue). Hover over the “Type” hint to see a definition of financial field types.
- Common expense examples: Hauling fees, Disposal costs
- Common revenue examples: Revenue from sale of recovered materials, Income generated from interest
- Provide a name for your financial field.
- Check the box if you wish to make the field required.
- When not checked, the financial field will appear on material transaction forms, but will not require a value in order to save the transaction.
- When checked, the financial field will appear on material transaction forms, and will require the user to enter a value in order to save the transaction.
- Click “Save” to complete the configuration of your financial field(s).
Please note: Up to 6 financial items can be configured for your Tracker program.
Removing financial fields
If you wish to remove financial fields, go to the “Tracker Settings” page and click the “REMOVE” link next to the field you wish to remove and click “Save”.
Please note: If you have saved any data using the field you intend to remove, you will not be able to remove it. You will need to delete all data associated with that financial field before you can completely remove it.

Changing existing financial fields
If you wish to change the type or re-name existing financial fields, simply make the modification to the appropriate field on the “Tracker Settings” page and click ”Save”.
Please note: This is a very powerful feature and should be used with caution. Changing an existing field will change the label and/or type for all historical and future transactions. For example, if you have previously tracked a field as an expense, and switch the existing field’s type to revenue, all data associated with the existing field will now be summarized in the analytical report as REVENUE.
Disabling financial tracking
If you wish to hide financial fields from your program, navigate to the “Tracker Settings” page and uncheck the “Enable Financial Tracking” checkbox and click “Save”.
If you have existing financial tracking data, all data will be preserved even if you disable the feature. Simply re-enable the feature to begin tracking financial information again. Previously configured expenses and/or revenue fields will still be displayed.
Analyzing financial data
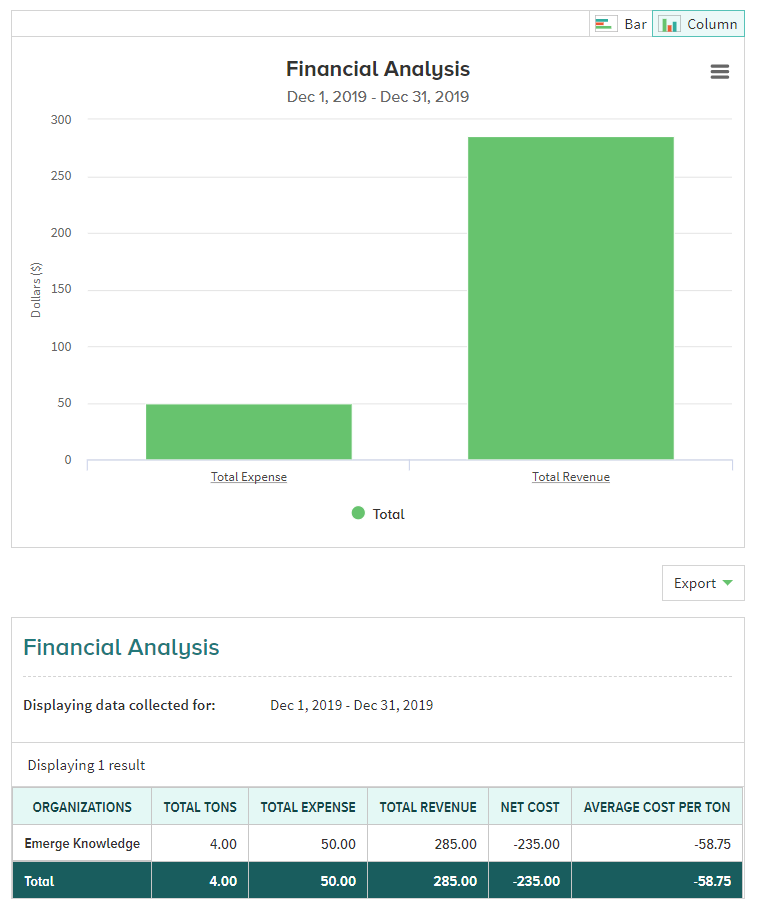
Once you’ve tracked your financial information, you can generate the Financial Analysis report to summarize expenses, revenues, net cost, and average cost per ton.
- Ensure you have access to the "Financial Analysis" report. Permissions for accessing the “Analytics” page is managed on the "Analytical Report Management" page in your Tracker program. If you don’t have access to this page, contact your Program Manager.
- Navigate to the "Analytics" page.
- Click the "Financial Analysis" report from the sidebar menu.
- Configure the “Timeframe Start” and “Timeframe End” dates of the report.
- If you’d like to analyze a subset of the organizations that participate in your program, choose them in the "Organizations" select box.
- Click “Generate” to produce the report.
